Mentee Showcase
“Materials Mentorship”
With Stan Brown
With Stan Brown
Tell Us About Yourself How did you hear about The Mentor Coalition?
Hello! My name is Stan Brown, I am a Material Artist from New Zealand currently working at Grinding Gear Games on Path of Exile 2. I came across the Mentor Coalition after signing up to the ArtStation Masterclass at the end of 2018 with Josh’s Stone Wall study, after the masterclass I soon saw Josh was offering Mentorships from his ArtStation blog posts promoting them and I knew it was something I really wanted do. I didn’t end up taking the Mentorship until much later though. This was because I had a trip to Sweden planned out, to stay at a game dev co-living house (Spelkollekivet - https://www.spelkollektivet.com/ ) where I had essentially 5 months of pure self-learning time. This meant that when I took my Mentorships I had complete free time to work on the projects in-between sessions and really focus on the advice given.
How was the Mentorship experience for you?
I took two Mentorships, a Materials course with Josh Lynch, and an Environment course with Christopher Radsby. Both were fantastic.
My first Mentorship was with Josh. We started off reviewing my portfolio at the time, and I was able to ask a lot of questions that I had prepared beforehand about working in the industry and general advice. Even before starting on the actual material stuff, getting these questions answered by someone with as much experience as Josh was incredibly helpful, just in my own understanding of the industry I was getting in to.
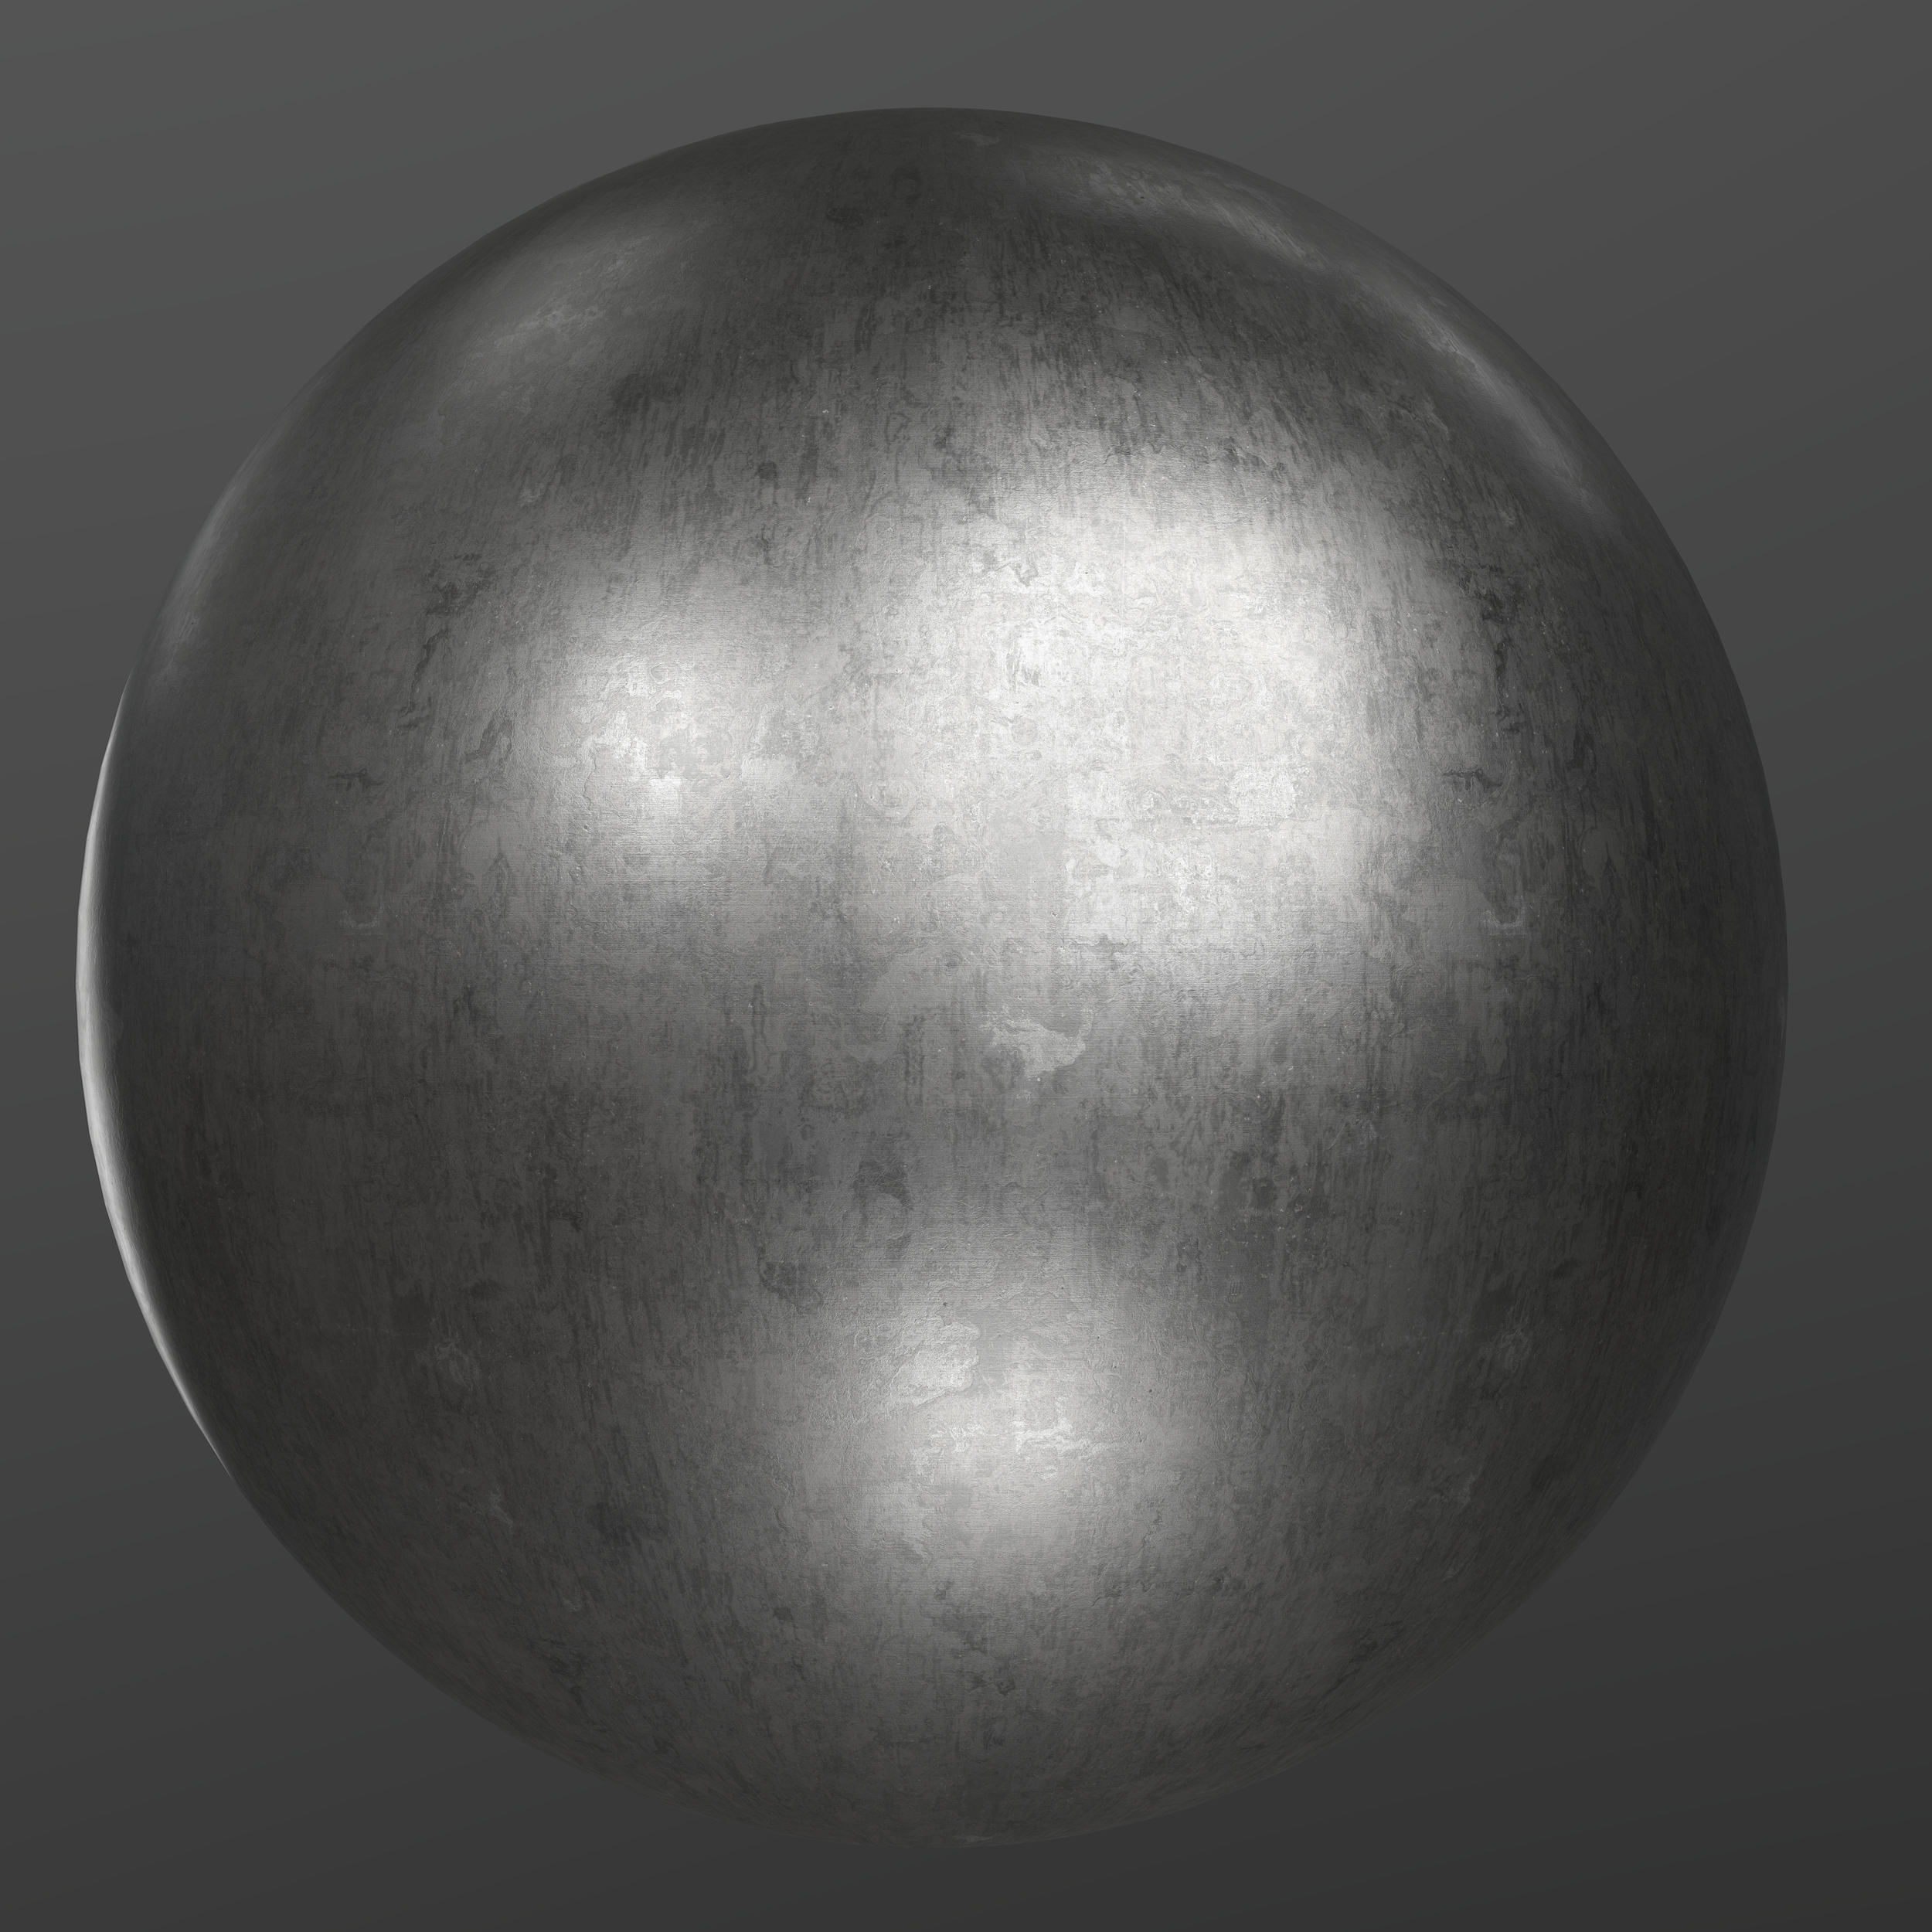
The main materials I covered with Josh over the course of our mentorship were the Rusting Painted Steel and Wooden Bridge.


As I had complete free time during the week between sessions, I was working on them consistently for the week and getting a whole bunch of feedback going through the graphs with Josh at the weekend, He would also answer questions I had on discord during the week. There were a few main take aways for me that I will share with you here!
The Rusting Painted Steel material was my first introduction to using the Non-uniform Blur node, I had never really touched it before but after that session it became a staple node for me!
It was a great was to get the paint peeling edges, an example of its use.
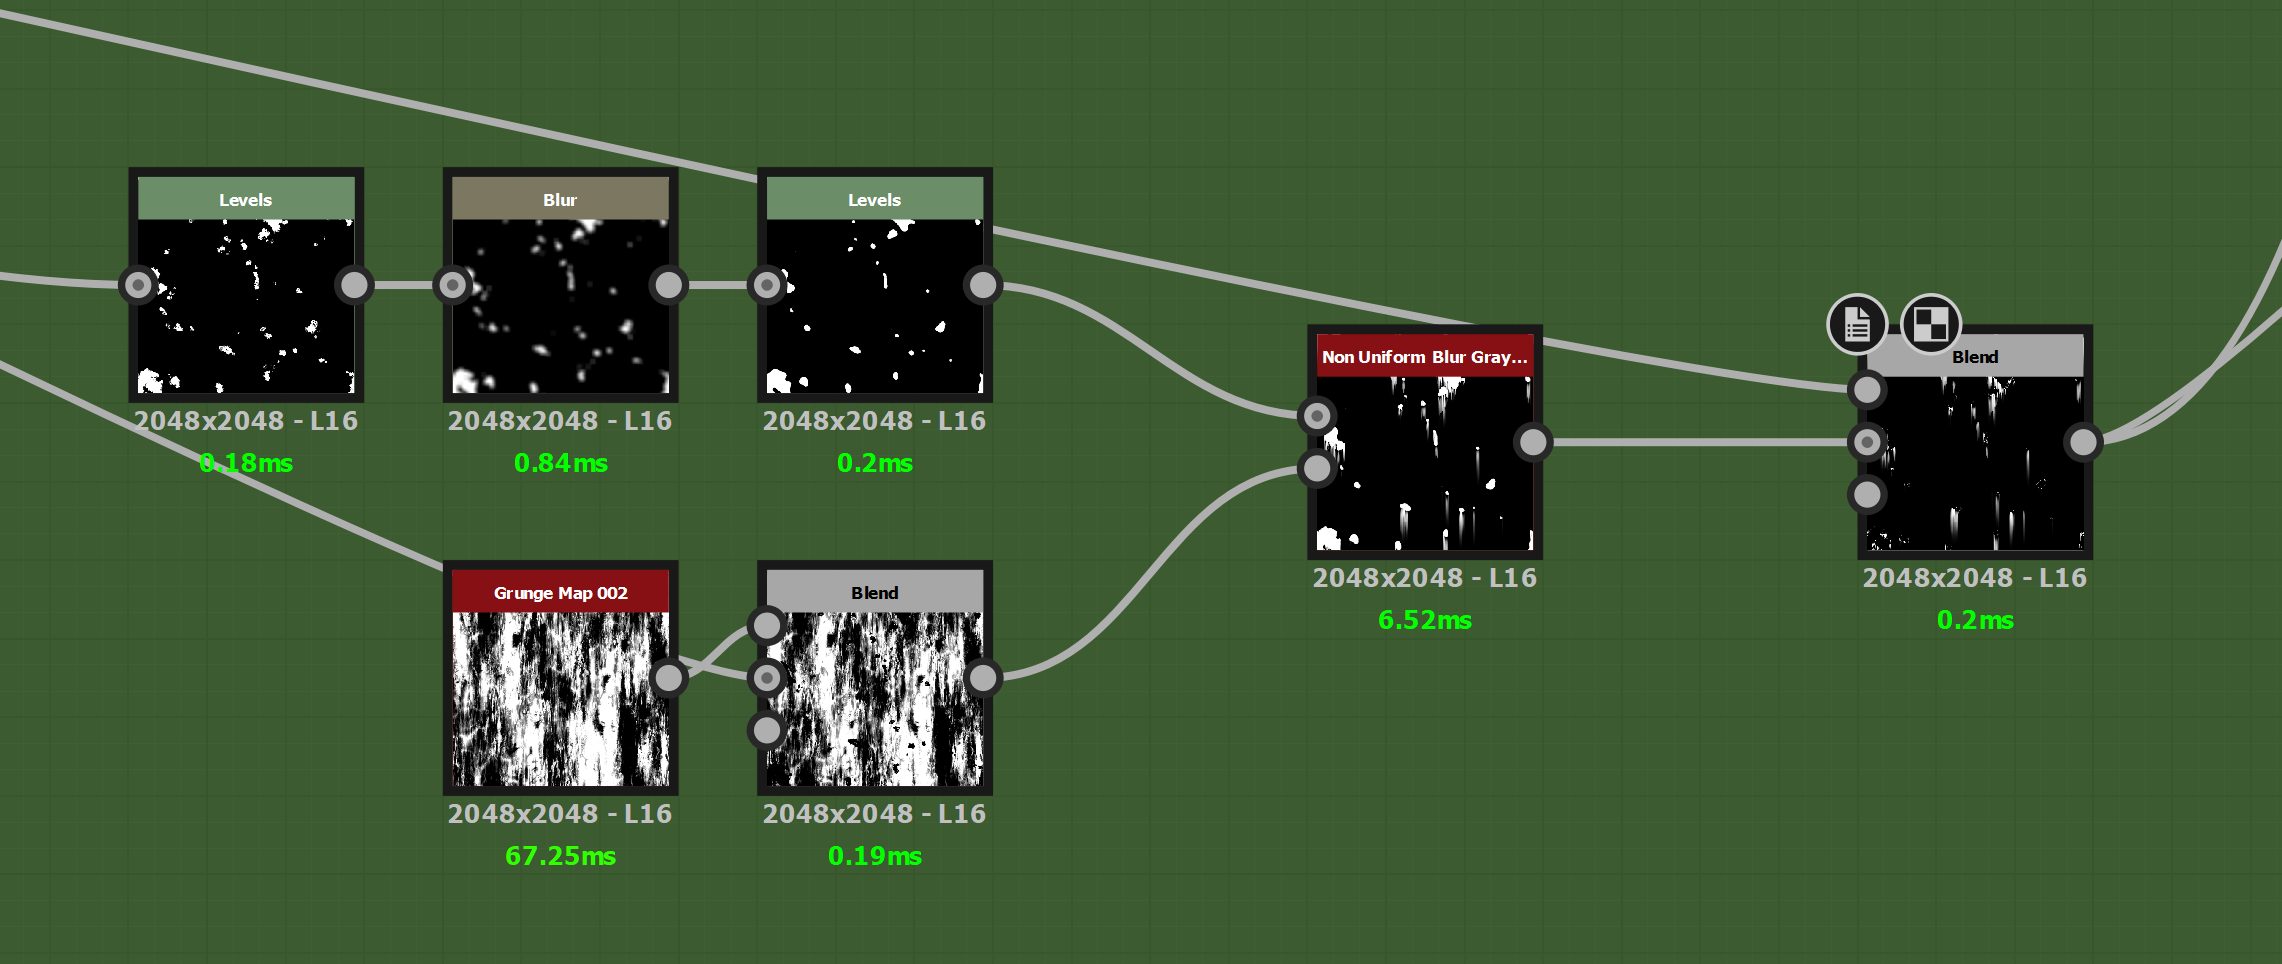
A quick set up to get this result kind of result with the Non-Uniform blur node would be like this:


This is a smaller version of how the peeling was set up in the rusting painted steel, adding a lot of extra break up and variation here with extra slope blurs and blends is the way to go. The non-uniform blur has a lot of incredible applications, try it out if you haven’t already.
When we started working on it I had an early version of the paint and the steel made and we started blending them together.

My early iterations of the blends were very intense! A thing I tended to do quite often was make everything quite strong, such as the cracks around the peeling and the intenseness of the bubbling – Subtle detail rather than in your face was one of the more valuable things I was taught to consider when making materials. I like to think I’m better at this now!

The rust drips were also a product of the non uniform blur, Such a handy node:
This is using the mask for our exposed steel, and a grunge as the blur mask, then having max Anisotropy and Asymmetry with the angle down. Playing around with the samples and blades setting can give interesting results. After this I recommend messing it up a bit potentially with some slope blur or other grunges.
The Wooden Bridge project holds a special place in my heart. It is a recreation of a bridge I walked to regularly while staying in Sweden, it was the also project I think I learned and grew the most from. It was the graph I spent the most time in with Josh that’s for sure.
I picked up a lot about layering from this material. Starting from plain wood planks, then adding layers of grime, dirt, water damage, scuffs / scratches and then adding in the top layers like sticks, stones, and leaves. Layering is often the key to a successful believable material. Layering gives it life and tells the story of what happened here, what the environment around it is like and even what kind of weather is around – these are the details you want to try and capture in your materials!

While there were lots of learning points from this project the main things, I want to talk about are: 1: Shape Splatter node. Use it. Instead of the tile sampler when scattering things around such as leaves, pebbles, sticks and so on. The options for it conforming to your height and slopes and such make the blending much more natural, and the shape splatter data you can extract from the node are great for further editing your scattered object. 2: You can separate your Normal and blend it back in! A concept that never occurred to me until Josh showed me. In
this case, it was mostly for the leaves on the bridge. They were supposed to be kind of wet and stuck to the wood. But I also wanted them to have some kind of height information, even just a bit, right?
But the Normal node from my Height gave quite a lip on the edge of the leaves so that they appeared to be very thick leaves. But by creating a separate normal when the leaves are blended into the Height, I was able to take the leaves mask, use an edge detect to get a pixel line around the leaves, and blend into the normal from before the leaves were added, minus the edge. As you can see below, the leave info is there, without a defined lip.

This has the added benefit of being able to adjust the Normal strength of the leaves and the ground separately. This technique has been very useful. A notable example for me using it down the line was the grass in my Mud Substance https://www.artstation.com/artwork/rAXAD5 :

Removing the pixel edge for the grass and small stones (Also using shape splatter!) helps things blend into the ground a lot more than you would expect. This technique is not needed in every situation though and should be considered another tool to be used when needed. Remember to do this with things blended on at the end of your height chain, as it’s trickier to add details to your normal map after separating it. 3: My last point here is the same as above except with AO! Not getting the results you want with your height into AO directly? Create another AO node at the strength you need (or adjust with a levels) and blend in back in with a mask.
The point I want to get across with this is that after your Height, Albedo and Roughness are painstakingly made with loving care, don’t always just plug in your Normal node and AO node to the Height and call it a day. Sometimes (especially with very layered materials) it makes a huge difference to tweak individual parts on them too.
4: Study scan data. Use albedo values picked from scans. Open scan normal maps and see how they look. Try and replicate them. This was a big game changer once I started apply this in my work! Any time I start a project I try and find some scan reference to look for approximate starting values. It helps a lot!
What impact did the Mentorship have on your Art Creation / Process / Workflow?
The mentorship helped refine my workflow a lot, with Josh I picked up a lot of Substance techniques and ways of thinking when approaching a material in designer. As mentioned above using scans as a base reference definitely helped improve my quality. The approach I learned from the mentorship put me on a good path for the last year and a half and I feel my work has improved much faster over that time, given I had a solid base of good practices to work from. An example of putting some of the techniques I learned here can be seen in some of my later work such as my Wall Generator! – You can see some of the peeling affect in the wall paper, and some of the wood techniques I got from the wooden bridge are present too:

How did your Mentorship experience compare to a traditional course or classroom?
As I am self-taught I never experienced the traditional course or classroom for art, but I can say that with the mentorship, you get out what you put in. As there is no curriculum, it is based around what you decide you are trying to achieve - with top quality guidance to help you get there. Having a mentor with years of experience listen to your story and understand on an individual level what you are trying to build on, and then help guide you there is invaluable. Because even if you don’t get to where you want to be within the mentorship duration (Which is unlikely as these things take time) they help you plan the steps to take afterward to get to where you want to go. Plus, you get to meet some great people and incredible artists on the way!
What has your professional work experience been since taking the Mentorship?
After the mentorship I was contracted to work on Space Beast Terror Fright for Nornware, (https://www.artstation.com/artwork/Vg0OWn) which was my first game credits! ( After that I worked freelance for a few clients, and then had the opportunity to join Dekogon which was an amazing experience, I learned a lot from the other artists and made a few friends! Early in 2020 I received a job offer from Grinding Gear Games through ArtStation (keep your portfolio up to date, it does happen!) which worked out really well, and that’s where I am now, working on Path of Exile with some great people! (You can see some of my work for Path of Exile Materials here: https://www.artstation.com/artwork/YeJ9nw )

Life Since The Mentorship? Future goals?
Since the mentorships and making it into the industry, I have been branching out a bit which is easier now since my work week is keeping me sharp in Substance! I have been diving into shaders and starting to get my feet wet with photogrammetry. I really enjoy finding good procedural ways to mix scan data and Substance so have been having fun playing with that. Future goals for me is to finish a small environment, but since I keep getting side-tracked by shiny material related things like photogrammetry (photo-scanning camping trips is what I’m excited for), we will see how we go. My fiancé and I have just got a puppy so we have a lot to keep us busy!

Would you recommend The Mentorship Coalition?
Yes. If you can afford it, have put the time in beforehand, and have the time to dedicate during the mentorship then 100% one of the best ways to grow. It’s cheaper than going to higher education in most cases and can be a more direct way to plan your pathway to your dream job. But keep in mind, they can show you the way, but you have to get there yourself! As mentioned earlier, you get out of it what you put in. If you have hit that plateau artistically and need advice on how to break through this is one of the best places to go.
I hope my experience was helpful, if you have any questions feel free to reach out on Artstation!
Thanks for reading, All the best, Stan Brown.
